Service Hours Widget
This widget helps departments display service availability in a clear, consistent format. It can be used for regular business hours, drop-in hours, field response hours, modified schedules, closures, and other service-specific schedules.
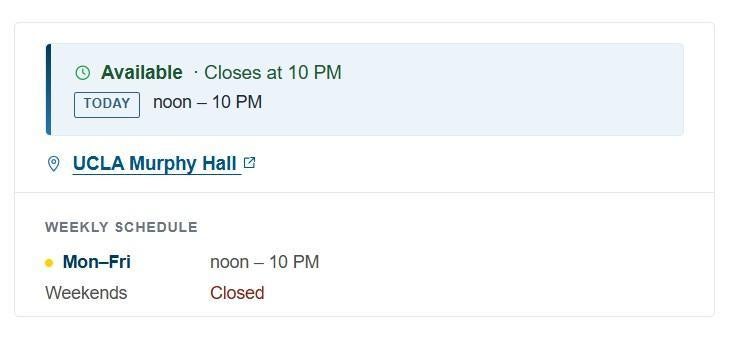
It is designed to improve the visitor experience by helping users quickly understand when and how to access a service. The screenshot on the right shows how the widget displays the current status, today’s hours, location, and weekly schedule.
Setup and Permissions
Initial Setup
To request setup, create a Jira ticket by emailing support@sait.ucla.edu.
Who Can Manage
Users with the Publisher role have full access to Hours widgets.
How to
Create the Widget ⚒️
- Log In. Once logged in, add /node/add to the end of your website URL. For example: yourwebsite.ucla.edu/node/add
- Select Hours Block. Follow the instructions on the Create Hours Block page to configure your Hours widget. See the Helpful Tips below for additional guidance.
- Review and Publish. Use the “Preview” tab to review your widget and make changes as needed. When ready, select “Published” under “Save as,” then click “Save.”
Your Hours widget is now published and ready to add to a page.
Helpful Tips
- Service Name: The only required field. For multiple Hours widgets, use a consistent naming format, such as “Hours: Regular Hours,” to keep them grouped together. Uncheck “Show the title” to hide the service name on the page.
- Weekly Schedule: Click “+ Add interval” to add another time period. Saturday and Sunday display as closed by default; click “+ Open this day” to add hours.
- Upcoming Exceptions: Check “Close on dates from a calendar” to automatically apply university holidays - no need to enter them manually.
Embed and Edit on a Page 📃
To add the Hours Widget to a page, open the page and place your cursor where you want the widget to appear. Click the “Custom Embed” icon, select the widget, and complete the embed process. Preview the page to confirm everything looks correct, then save your changes.
To edit the widget, double-click the widget and select “Edit Custom Embed.” This will open a new browser tab where you can make your edits. When finished, be sure to save both the widget and the page to apply your changes.
Find an Existing Widget 🔎
You can find the widget under the “Content” tab. Look for the widget name associated with the “Hours Block” content type, or use the content type filter to quickly locate it.
Content Guidelines
Best Practices
- Keep labels short and clear, such as “Regular Hours,” “Drop-In Hours,” or “Walk-in Hours”
- Add date ranges for seasonal or short-term schedules
- Use notes only when extra context is needed
- Review the page where the widget is embedded after saving changes
- Remove expired schedules to avoid confusion